Equipment for metal hardware, fasteners and component parts сold production
ROD FASTENERS HEADING DIAGRAMS
(for reference)
It is still unknown when the screw appeared - the prototype of modern threaded fasteners. Screws, dating back many centuries BC were found by archaeologists in China and in Asia, and the Americas. Moreover as for precision of manufacturing ancient products excel the later samples.
Perfection of designs of machines and mechanisms, development of new technologies of their manufacture is constantly setting new requirements for the design of fasteners, technologies and equipment for their manufacture. Modern threaded fasteners in addition to traditional properties of a threaded joint have additional functions: self-drilling, self-cutting, self-skinning, thread-embossing. However, almost all of them have in their structure a support element - a head, that is a main characteristic feature of identification and classification of the fastener.
Shape of fastener heads can be both standardized and special designed. Stem fasteners with a standardized design of the head are most often used in mechanical engineering. The core parts having special shape and geometry, applied only in certain connections, where it is impossible to use standardized fasteners.
Different fasteners application depends on the purpose of junction, junction functionality, space for installation, the size and nature of the loads and operating conditions. The design and size of the fasteners heads are regulated by the relevant regulatory technical documents on the fasteners.
The greatest use is made of the following groups of fasteners:
- Round, countersunk, semi-countersunk, cylindrical head (rivets, axles, fingers),
- Round, countersunk, semi-countersunk, cylindrical, hexagonal head with/or flat-slot screws with internal four-, six- or dodecahedron heads (screws, self-tappers, wood screws, special parts),
- square or hexagon head (screws, bolts, self-tappers and special parts),
- square, hexagon, dodecahedral head and flange with flat or serrated base,
- with head or socket head cap with a profile of TORX® type (star-shaped profile, which is gradually replacing hexagon and dodecahedral head),
- with asymmetric head (with unilateral or bilateral flat spot),
- with a head, forming a T-shaped structure of the fastener,
- the ring structure of the head as of the eye-bolts,
- with a special design as of the spherical head type, conical heads, heads, combination of 2, 3, or 4 elements.
The design of the fastener head depends essentially on the technology of its production, especially if the fasteners are made by cold forming. In practice, the circuit of forming heads of one and the same structure may have several alternatives. Choosing of the most sustainable option depends on the design of other elements of the fastener, the functionality of the equipment used and the applicable grades.
Round, flat, countersunk, cylindrical head fasteners have a simple, symmetrical shape. Such details are traditionally made in one, two strokes at one position (in a die). In one stroke relatively small heads are formed to the diameter of the rod, D≤2 ... 2,5d [2]. In two strokes heads of medium size are formed, D≤3d. By the first stroke a preliminary set of conical shape is performed; by the second stroke the final geometry of parts head is formed. In some cases, which is typical for smaller heads, the first stroke rather than conical shape, forms the head of shape approximate to the final shape and the second stroke is performed for the final shaping and size calibration Fig. 1. In order to further increase the diameter of parts head three strokes are carried out in one die. The third stroke deforms preformed head by reducing its height and increasing the outer diameter. Such a scheme of three strokes is most often used for heading semi-circular and cylindrical heads.
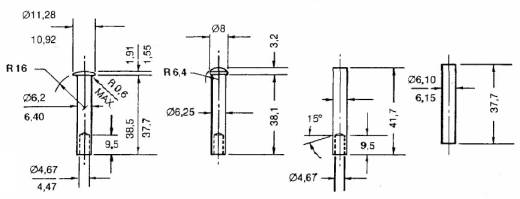
Fig. 1. Rivets heading diagram [2].
If the part head has a size D> 3d heading scheme varies. For parts heading cold heading machine with 2 ... 3 matrices is required and the blank feeding unit. In this case, metal having a diameter approximate to the outer diameter of the head is used, at the first position extruding of a part rod is carried out and the final geometry of the part head is formed at the second or third position, and sometimes for special parts heading - at the fourth position. Depending on the design of other elements of the part, for example, stepped axle, small-headed parts are made for 3 ... 4 strokes in 1 ..2 matrices.
Alternative heads with D> 3d are headed with use of "floating" spring-loaded puncheon, whose task at the time of forming seal the cavity of the landing and provide direction for metal Fig. 2. In practice of cold heading of parts with a larger diameter of heads there is a scheme of local fixing in the puncheon of the metal rod that goes to the head. This scheme artificially creates a condition of h = 2,25d, necessary to preserve the stability of the blank.

Fig. 2. The design of the "floating" puncheon [2].
The heading of parts with a cross or flat head is identical to some schemes without slots. Cross slot can be formed in round, countersunk, semi-countersunk and cylindrical head. Heading of cross slots is usually carried out in two strokes with a set of preliminary and final details of the formation of the head, Fig. 3. Flat slot is traditionally formed in round, cylindrical or countersunk form. Flat slot in a countersunk head is carried out by an additional operation before thread rolling.
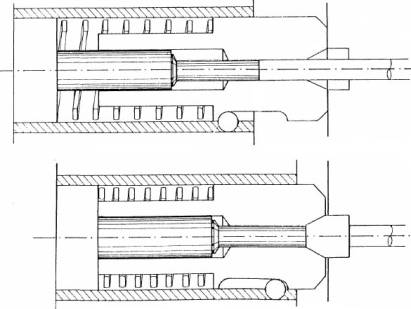
Fig. 3. Heading scheme of flat slot in countersunk head is carried out in two strokes with "floating" puncheon.
Formation of the inner square, hexagon, dodecahedron indentations with radial profile (type TORX®) is carried out on cold forging machines with a function of parts pickup by figure shaping punch. Scheme of heading practically does not differ from the scheme of cross slots heading, however due to the structure of the shaped cavities with parallel faces to the part axis, cavity-forming puncheon after extrusion and heading is to pull the item from die channel during the return stroke of the slider. The heading of the head with a shaped recess is carried out by two strokes (or two positions) with a preliminary set of heads with cavity design and final cavity extrusion and calibrating the geometric dimensions of the head. Other elements or parts are executed when combining operations (for example, the calibration of the rod head and heading) or in other positions.
Square, hexagonal head or a head of more complex forms, such as gear blanks, in most cases, obtained to preform cutting element of cylindrical or barrel shape, obtained in previous positions. Forming of square or hexagonal heads by cutting provides clear faces and edges, using a simple tool, simple scheme and heading cold forging equipment with lower nominal effort. The only negative point in the formation of a cutting head of waste generation is "cutting", that, especially for parts with short threaded portion, can reach up to 15 ... 20% of the net weight of the item. There are other ways and schemes of forming square or hexagon heads, based on pressing heads and figured cavity of the die. The disadvantage of these methods consists in forming of rounded edges between the faces of the head, it consequently reduces the time and effort to tightening the threaded connection. HATEBUR company patented flash-free heading of hex heads provides a consistent set of hex in several matrices Fig. 4. This method allows you to get closer to the required definition of edges of the head, but the proposed technology complicates the tool and the blank feeding requirements for the positions. As an alternative to obtaining the hexagonal or square head is sequencing reducing of hexahedron and saw flash. This method allows to reduce the waste of metal burrs, but also requires more complex design cold heading tool.
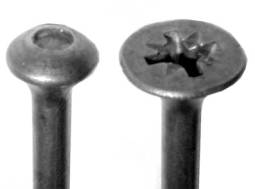
Fig. 4. Sceme of flash-free heading of hex heads, HATEBUR company patent HATEBUR.
Some parts constructions provide holes in their heads. By method of cold heading such heads are obtained by punching holes of desired shape and size, Fig. 5.
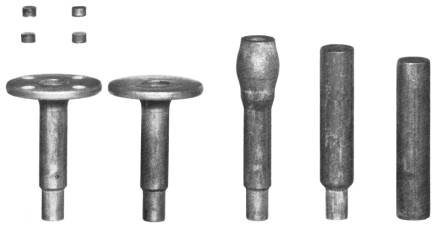
Fig. 5. Scheme of heading parts with special heads.
In practice, cold heading widely adopted the following methods of manufacturing fasteners with a head design which has a flange (or shoulder):
- Shaping the head with flange by local swaging,
- Shaping the head with flange by double cutting,
- Shaping the head with flange by operations of reduction of polyhedron and local flange swaging.
- Each method of manufacturing of flanged heads is used depending on the set technical requirements and design details.
Heads heading by local swagging - the easiest and most widely used method of obtaining the hex head with flange. Forming part of the final geometry of the head with flange can be implemented in two positions of headers (or two strokes in one die). The first position - a preliminary set of conical shape of the head, the second - the final shaping of the head and the flange, Fig. 4.
![Scheme of heading hex head with flange by local swaging [4].](assets/images/cold_form/punch head/7.jpg)
Fig. 4. Scheme of heading hex head with flange by local swaging [4].
A method of forming heads by double cutting requires special pretreatment to head cutting. With free local swaging during the pre-operation barrel-shaped head is formed and during the first cutting pit occur on the faces of the hexagon. Therefore, pre-headed head must have a cylindrical shape and be processed by closed local swaging. The diameter of the cylindrical head after pre-heading should be slightly larger than the outer diameter of the flange, as at the first cutting head, such as hexagon, due to uneven removal of the metal layer (on the faces- more, at the edges - less) in the corners of the head base metal gaps arise which in low diameter of the cylindrical head can enter the flange. These conditions are valid for manufacturing parts with high hexagon head portion (H> 0,8 ... 1,2S). For heads with hexagon (or polyhedral) head, the height of which is equal to H <0,8S use the scheme shown in Fig. 5.
To implement the double-edged cuttering use a die of hexagon and round channels. Die is identical to the die used to cut the hex head bolts.
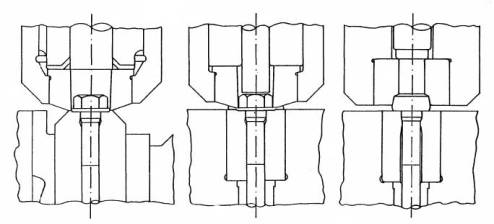
Fig. 5. The design and construction of the heading equipment with double-cutting of heads [2].
A method of forming a head by polygon reduction followed by local swaging of flange has found its application in the manufacture of precision parts Fig. 6, 7. Shaping head pressure reduction followed by a swaging has the following technological features. The preform before reduction, for example, hexagon, must have a strict cylindrical shape with a maximum deviation of diameter or a cylindrical shape with pre-recruited flange parts with enlarged flange. The outer diameter of the cylindrical portion of the head for reduction is approximately equal to the diameter of the circle circumscribed around a polyhedral head.
The reduction of the previously set cylindrical billet is performed under the condition of relative degree of deformation of not more than 17 ... 25%, calculated by the sectional area of the workpiece before and after the reduction. Double angle deformation zone should not exceed 30 degrees (in practice adopted by double angle of 26 degrees).
The design of the reduction tool head has its own peculiarities. Working chamber of reducing the punch has three structural grounds: a) lead conical section, double angle should not exceed 26 ... 30 degrees, b) Gauge section with geometry of polyhedron desired shape, and c) the output land needed to reduce the contact friction. In general, the design of reduction tool resembles the design of the punch die used for wire drawing.
The blank after reduction has polyhedron, cylindrical portion of the diameter of the blank prior to deformation and the conical portion to the polyhedron cylindrical portion. On the next position the formation of a local swaging of cylindrical head flange is performed. If flange taking is carried out on the other heading positions, it is necessary to ensure accurate alignment of the hex die cavity with hex head cavity of the blank when pushed it into the mold cavity to the next after head reduction position. In this case, in the construction of cold heading tool punch-ejector spring bar mudt br provided. Cold forging equipment must have a high precision technology on the nodes of the punch unit and matrices unit.
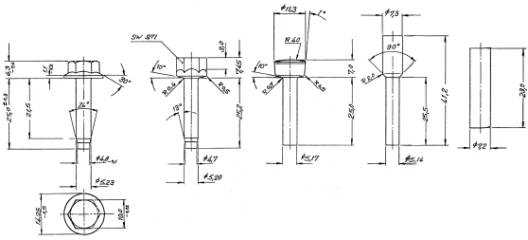
Fig. 6. Scheme of heading hex head with flange by local swaging and hex reducing [2].
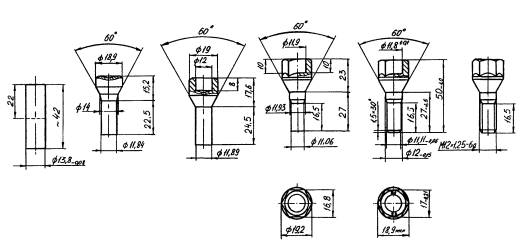
Fig. 7. Scheme of heading a part 2112-3101040-10 wheel bolt by reducing a hex head [5].
Scheme of heading of head with outer profile of the type and design of cold heading TORX® tools practically does not differ from the heading of parts with multi-faceted head and flange, resulting in polyhedron reduction and local swaging of flange Fig. 8. At the same time, given the high demands on the accuracy of the geometric dimensions of the head TORX®, you must provide the relevant requirements for precision cold heading tool and accuracy of cold forging equipment.
![Fig. 8. Scheme of heading parts with heads of TORX® type (with star-shaped profile) [6].](assets/images/cold_form/punch head/11.gif)
Fig. 8. Scheme of heading parts with heads of TORX® type (with star-shaped profile) [6].
Manufacturing of core parts with an asymmetric head, depending on the desired geometry is performed as follows:
- Heading of polyhedral heads with cutting, trimming using appropriate matrices.
- The heading of the head with a consistent set of asymmetric shape and fin cutting along the contour, including heading the landing of parts with a T-shaped head.
- The heading of the head with a bend axis.
- Formation of the head in two planes, like the heading of "Eye" bolts.
Technology of heading parts with special design as with spherical heads, conical heads, heads, combined of 2, 3, or four elements, such as the head with hexagon flange, cone passing from the flange to the area, etc. constructed depending on the configuration and number of head elements included in the head structure, Fig. 9, 10.
![Fig. 9. Scheme of heading parts with special heads [6].](assets/images/cold_form/punch head/12.jpg)
Fig. 9. Scheme of heading parts with special heads [6].
![Fig. 10. Scheme of heading parts with special heads [2].](assets/images/cold_form/punch head/13.jpg)
Fig. 10. Scheme of heading parts with special heads [2].